Newsletter Video, March 2023
Click Below - Add Your Own Comment
Disclaimer: The exercises here are for educational purposes only and before you try any of them, consult with your therapist or doctor.
Movements of the Month for the Major Muscles Crossing the Knee
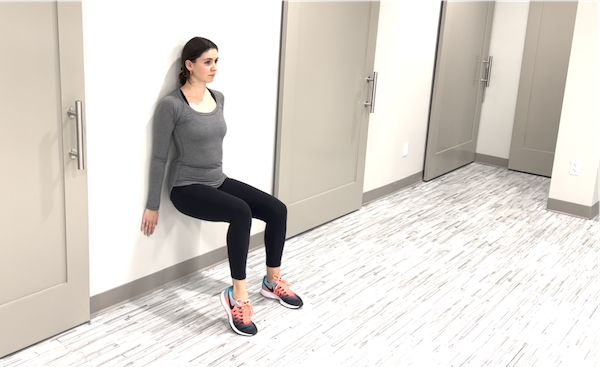
The Wall Sit

The Basic Wall Sit
The wall sit is a great exercise for building strength in your thighs, particularly in the quadriceps.
Start by standing with your back against a wall, with your feet about shoulder-width apart and about a foot away from the wall.
If you like, use a towel or exercise ball to reduce friction between your back and the wall.
- Slowly slide your back down the wall, bending your knees and keeping your feet flat on the ground. Your knees should be at a 60 to 90-degree angle.
- Make sure your back stays flat against the wall and your core is engaged. Distribute the weight between your heels and the balls of your feet.
- Hold this position for 5-10 seconds, breathing steadily.
- To come out of the wall sit, slowly push yourself back up the wall using your legs, until you're standing upright again.
Repeat 10-15 times, with a 60-second rest between each set.
Perform 2-3 sets.
Some tips to keep in mind:
-
If you feel any pain or discomfort in your knees, stop the exercise immediately and adjust your position.
If you have any questions, please feel free to contact us.
The Advanced Wall Sit Exercise
(Progress to this after you can do 3 sets of 10 of the Basic Wall Sit Exercise described above)
Start by standing with your back against a wall, with your feet about shoulder-width apart and about a foot away from the wall.
If you like, use a towel or exercise ball to reduce friction between your back and the wall.
- Slowly slide your back down the wall, bending your knees and keeping your feet flat on the ground. Your knees should be at a 60 to 90-degree angle.
- Make sure your back stays flat against the wall and your core is engaged.
- Raise the heel of one foot off of the floor, but keep the ball of your foot and toes in contact with the ground.
- Gently shift your weight onto your other leg.
- Hold this position for 5-10 seconds, breathing steadily.
- To come out of the wall sit by slowly pushing yourself back up.
Repeat 10-15 times, with a 60-second rest between each set.
Perform 2-3 sets.
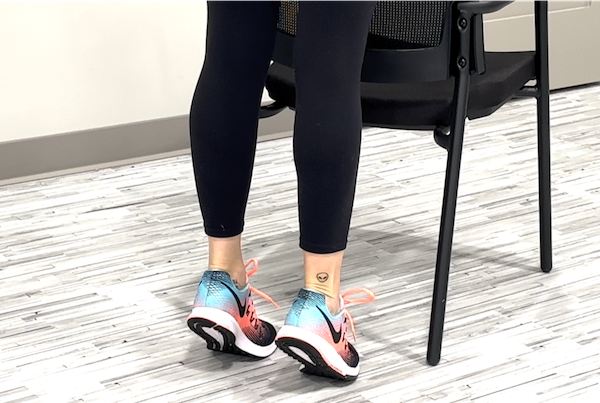
The Calf Raise

The Basic Calf Raise
- Stand with your feet shoulder-width apart, with your toes pointing forward.
- Slowly lift your heels off the ground, rising up onto the balls of your feet. Make sure to keep your knees straight and your core engaged.
- Hold this position for 3-5 seconds, then lower your heels back down to the ground.
- Repeat for 10-15 repetitions, then rest for 60 seconds.
- Complete 2-3 sets, with a 30-second rest between each set.
Some tips to keep in mind:
- Make sure to keep your body straight and avoid leaning forward or backward.
- Focus on squeezing your calf muscles as you lift your heels off the ground.
The Advanced Calf Raise - Single-leg Eccentric Lowering
(Progress to this after you can do 3 sets of 10 of the Basic Calf Raise Exercise described above)
- Stand with your feet shoulder-width apart, with your toes pointing forward.
- Slowly lift both heels off the ground, rising up onto the balls of your feet. Make sure to keep your knees straight and your core engaged.
- Once you've lifted both heels off the ground, lift one foot a couple inches off the ground, and hold this position for 3-5 seconds.
- Slowly lower your other heel back down to the ground.
Repeat 10-15 times, then switch to the other leg and repeat for another 10-15 reps. If you’d like to alternate between sides, that is another option.
Perform 2-3 sets.
The Expert Heel Raise Exercise
(Progress to this after you can do 3 sets of 10 per side, of the Advanced Calf Raise Exercise described above)
- Stand with one foot flat on the ground, and lift the other foot off the ground.
- Slowly lift the heel of your standing foot off the ground, rising up onto the ball of your foot. Make sure to keep your knee straight and your core engaged.
- Hold this position for 3-5 seconds, then lower your heel back down to the ground.
Repeat for 10-15 repetitions, with a 60-second rest between each set.
Perform 2-3 sets.
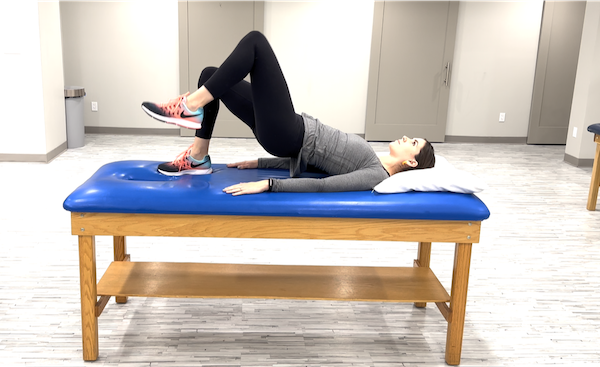
The Bridge

The Basic Bridge Exercise
The bridge exercise is a great way to strengthen your hamstrings, glutes, lower back, and core. Strong hamstrings and glutes are critical for proper function of the knee.
Here's how to perform the basic bridge:
- Lie on your back with your knees bent and your feet flat on the ground, about hip-distance apart. Make sure your arms are resting at your sides.
- Engage your glutes and lift your hips off the ground, while keeping your feet firmly planted on the ground.
- Focus on squeezing your glutes at the top of the movement and keeping your abs engaged. Your body should form a straight line from your shoulders to your knees.
- Hold the bridge position for 3-5 seconds, then lower your hips back down to the ground.
Repeat 10-15 times, with a 60-second rest between each set.
Perform 2-3 sets.
Some tips to keep in mind:
- Make sure you're not arching your back too much or overextending your neck. Keep your neck relaxed and your spine neutral.
- If you find the exercise too easy, try adding a resistance band around your thighs or holding a weight on your hips.
- Avoid pushing through any pain or discomfort in your lower back. If you experience pain, stop the exercise and contact us for help.
The Advanced Bridge Exercise
(Progress to this after you can do 3 sets of 10 of the Basic Bridge Exercise described above)
- Lie on your back with your knees bent and your feet flat on the ground, hip-distance apart. Make sure your arms are resting at your sides.
- Engage your glutes and lift your hips off the ground, while keeping your feet firmly planted on the ground.
- Once you've lifted your hips off the ground, lift one foot off the ground and hold it in the air for 3-5 seconds.
- Your body should form a straight line from your shoulders to your knee on the lifted leg.
- Lower your foot back down to the ground and your hips back to the starting position.
- Repeat with the other leg, lifting it off the ground and holding the position for 3-5 seconds before lowering it back down.
Repeat 10-15 times, with a 60-second rest between each set.
Perform 2-3 sets.
The Expert Bridge Exercise
(Progress to this after you can do 3 sets of 10 of the Advanced Bridge Exercise described above)
- Lie on your back with your knees bent and your feet flat on the ground, hip-distance apart.
- Lift one leg off the ground first.
- Engage your glutes and lift your hips off the ground, while keeping your foot on the ground and your other leg off the ground.
- Focus on squeezing your glutes at the top of the movement and keeping your abs engaged. Your body should form a straight line from your shoulders to your knee on the lifted leg.
Repeat 10-15 times, with a 60-second rest between each set.
Perform 2-3 sets.
Newsletter Video Archive
Disclaimer
The information in this video is intended for informational and educational purposes only and in no way should be taken to be the provision or practice of physical therapy, medical, or professional healthcare advice or services. The information should not be considered complete or exhaustive and should not be used for diagnostic or treatment purposes without first consulting with your physical therapist, occupational therapist, physician or other healthcare provider. The owners of this website accept no responsibility for the misuse of information contained within this website.
